Saturday, 7 November 2015
Sunday, 1 November 2015

Sunday, 6 September 2015
Try to bear that much cuteness - Amigurumi Wedding Gift
A little something for a very special couple.


A Perfect Wedding Gift
I'd almost get married again just to get one of those ;)
It was made for two very special rabbits that got married this year.
Hope they loved this little keepsake.


Monday, 27 April 2015


Sunday, 26 April 2015
Plane - free amigurumi pattern

You need:
3.0 mm crotchet hook
yarn colours: white, light brown, dark brown, baby blue, navy blue
fiberfill
Shortcuts:
sc – single crotchet
ds – double stitch (increase)
dec – decrease
Main body
start with dark brown
6 sc in a magic ring(6)
6ds (12)
change to light brown
(1sc,1ds) x 6 (18)
(2sc,1ds) x 6 (24)
(3sc,1ds) x 6 (30)
(4sc,1ds) x 6 (36)
(5sc,1ds) x 6 (42)
42sc x 6
change to baby blue (the main colour)
42sc
(5sc,1dec) x 6 (36)
36sc x 5
(4sc,1 dec) x 6 (30)
30sc x 4
(3sc,1 dec) x 6 (24)
24sc x 3
(2sc,1 dec) x 6 (18)
18sc x 2
(1sc,1 dec) x 6 (12)
6dec
window (white yarn)start with a chain of 6sc
5sc back ← ,1ds, 5sc →, 1ds
14sc round
1ds, 2sc, 1ds, (3sc, 1ds) x3
1sc, 1ds, (3sc,1ds) x2, (4sc,1ds) x2

wings (navy blue yarn) x2
6sc in a magic ring (6)
6ds (12)
(1sc,1ds) x 6 (18)
18sc x 3
(5sc,1ds) x 3 (21)
21sc x 5
5sc back ← ,1ds, 5sc →, 1ds
14sc round
1ds, 2sc, 1ds, (3sc, 1ds) x3
1sc, 1ds, (3sc,1ds) x2, (4sc,1ds) x2
wings (navy blue yarn) x2
6sc in a magic ring (6)
6ds (12)
(1sc,1ds) x 6 (18)
18sc x 3
(5sc,1ds) x 3 (21)
21sc x 5
stabilisers (navy blue yarn) x3
6sc in a magic ring
(1sc,1ds) x 3 (9)
9sc x 2
(2sc,1ds) x 3 (12)
12sc
propeller
spinner (baby blue yarn)
6sc in a magic ring (6)
6ds (12)
12sc x 2
6 dec stitching in back loop
blades (dark brown yarn)
6sc in a magic ring (6)
(1sc,1ds) x 3 (9)
(2sc,1ds) x 3 (12)
12sc x 3
(4sc, 1dec) x 2 (10)
(3sc, 1dec) x 2 (8)
(2sc, 1dec) x 2 (6)
6sc x 2
Monday, 13 April 2015

Sunday, 12 April 2015
Amigurumi teddy bear Daisy and her flower dress pattern

Daisy is a vintage style girl teddy
bear wearing a flower dress, which is also very easy to make.
The dress is made of a yellow yarn
chain and seven white yarn petals.

To make the belt, start with a yellow
yarn and chain 33 stitches. Stitch loops 29 and 33 together to make a
loop for a button and then continue stitching the 29 sc back to
create a belt of two rows.
Before cutting off the yellow yarn,
attach the button to the end of the belt you just reached.
Change to white yarn and begin with the
first petal. Chain 5sc to first five stitches of the yellow belt.
Continue to the second row and following this pattern:
| | | | | 5
|
| | | | 5
/ | | | | | \ 7
/ | | | | | | | \ 9
| | | | | | | | | 9
| | | | | | | | | 9
\ | | | | | | | / 7
\ | | | | | / 5
\ | | | / 3
\ | / 1
Do
the same for the next 6 petals, using the last stitch of the previous
as the first stitch of the following petal i.e. the petals should
start at stitches 1,5,9,13,17, 21,25.

The headband is made the same way as the skirt belt and to make the flower I followed this video tutorial and added one more petal to the original pattern: https://www.youtube.com/watch?v=-iGlvEiI4NY&feature=share
Thursday, 2 April 2015
Love you zebra - free amigurumi pattern

3.75 mm crotchet hook
dark grey and white yarn (zebra)
red yarn (heart)
fiberfill
two black beads or safety eyes
Shortcuts:
sc – single crotchet
ds – double stitch (increase)
dec – decrease
Head Start with grey yarn - 6sc in a magic ring (6)
1. 6ds (12)
2. (2sc,1ds) x 4 (16)
3. (3sc,1ds) x 4 (20)
4. (4sc,1ds) x 4 (24)
5. (5sc,1ds) x 4 (28)
6. (6sc,1ds) x 4 (32)
7. 32 sc
change to white yarn
8. 32sc
9. 32sc
10. (6sc,1dec) x4 (28)
change to grey yarn
11. 28sc
12. (5sc,1dec) x4 (24)
13. 24sc
change to white
14. (4sc,1dec) x4 (20)
15. 20sc
16. 20sc
change to grey
17. 20sc
18. (3sc,1dec) x4 (16)
19. (2sc,1dec) x4 (12)
20. dec till closing
Body Start with grey yarn - 6sc in a magic ring (6)
1. 6ds (12)
2. (1sc,1ds) x6 (18)
3. (2sc,1ds) x 6 (24)
change to white yarn
4. (3sc,1ds) x 6 (30)
5. (4sc,1ds) x 6 (36)
6. (5sc,1ds) x 6 (42)
change to grey
7. (6sc,1ds) x 6 (48)
8. 48sc
9. 48sc
change to white
10. (6sc,1dec) x 6 (42)
11. 42sc
12. (5sc,1dec) x 6 (36)
change to grey
13. 36sc
14. (4sc,1dec) x 6 (30)
15. 30sc
change to white
16. (3sc,1dec) x 6 (24)
17. 24sc
18. (2sc,1dec) x 6 (18)
change to grey
19. 18sc
20. (4sc,1dec) x 3 (15)
21. 15sc
change to white
22. (3sc,1dec) x 3 (12)
23. (2sc,1dec) x 6 (9)
24. (1sc,1dec) x 6 (6)
25. 6dec till closing
Arms (make 2) Start with grey yarn – 4sc in a magic ring (4)
1. 1ds x 4 (8)
2. (1sc,1ds) x 4 (12)
3. 12sc
change to white
4. 12sc
5. 12sc
6. 12sc
change to grey
7. 12sc
8. (2sc,1dec) x 3 (9)
9. (1sc,1dec) x 3 (6)
10. 6dec till closing
Legs (make 2) Start with grey yarn – 6sc in a magic ring (6)
1. 6ds (12)
2. (3sc,1ds) x 3 (15)
3. (2sc,1ds) x 5 (20)
4. 20sc
change to white
5. 20sc
6. 20sc
7. 20sc
change to grey
8. (3sc,1dec) x 4 (16)
9. 16sc
10. (2sc,1dec) x 4 (12)
change to white
11. 12sc
12. (4sc,1dec) x 2 (10)
13. dec until closing
Ears (make 2) grey yarn only, start with 4sc in a magic ring (4)
1. (1sc,1ds) x 2 (6)
2. (1sc,1ds) x 3 (9)
3. (1sc,1ds) x 4 (12)
4. (1sc,1dec) x 3 (9)
5. (1sc,1dec) x 2 (6)
6. dec until closing
Heart red yarn, start with 6sc in a magic ring
1. (1sc,1ds) x 2(9)
2. (2sc,1ds) x 3 (12)
3. (1sc,1ds) x 6 (18)
4. (5sc,1ds) x 3 (21)
5. (6sc,1ds) x 3 (24)
6. (7sc,1ds) x 3 (27)---
7. (8sc,1ds) x 3 (30)
8. (9sc,1ds) x 3 (33)
9. (10sc,1ds) x 3 (36)
10. (11sc,1ds) x 3 (39)
join stitches 1 and 20 with a chain of 2sc (that will divide your heart in two) (2x20)
11.start on one part with 20sc
12. 20sc
13. (3sc,1dec) x 4 (16)
14. (2sc,1dec) x 4 (12)
15. 6dm and finish off
repeat 12-16 for the other part
To make the hair, cut a approx 8x3 cm strap of cardboard. Wrap your dark yarn around the thinner side until your cardboard covers with yarn and then cut through one side. This way you'll end up with a number of 6cm long straps of yarn. Fold a strap in half and pull it slightly through a stitch where you want your hair to begin. Once you've pulled a small loop, pull both the remaining ends all the way through the loop. Just like in this video: https://www.youtube.com/watch?v=3Rnf7Ok24Mk#action=share
To make a tail, make a chain of 10sc and stitch all the way back again (2 rows of 10sc). Attach the hair just like when you did to make the mane.
Sunday, 22 March 2015
Amateur Quilling Easter Cards :)
.jpg)
Rolling and folding paper strips with your fingers is all you need to achieve pretty good quilling effects. The arabesque style of this technique makes great egg decoration patterns. Whether coloured or just white over a colorful background, simple circles, hearts and raindrops convert your egg into a very original card decoration.
Tuesday, 17 March 2015
Aren't they lovely?! (on how to make your toys move arms and legs)
First, I have to admit that I haven't been knitting for a loooooong time and if it wasn't for this pattern, I would possibly never have started again. These are the two toys that I fell in love with the first time I saw this knitting pattern available on By Small Means: https://bysmallmeans.wordpress.com/free-patterns-and-tutorials/ and it was there FOR FREE!!! I just had to try it!
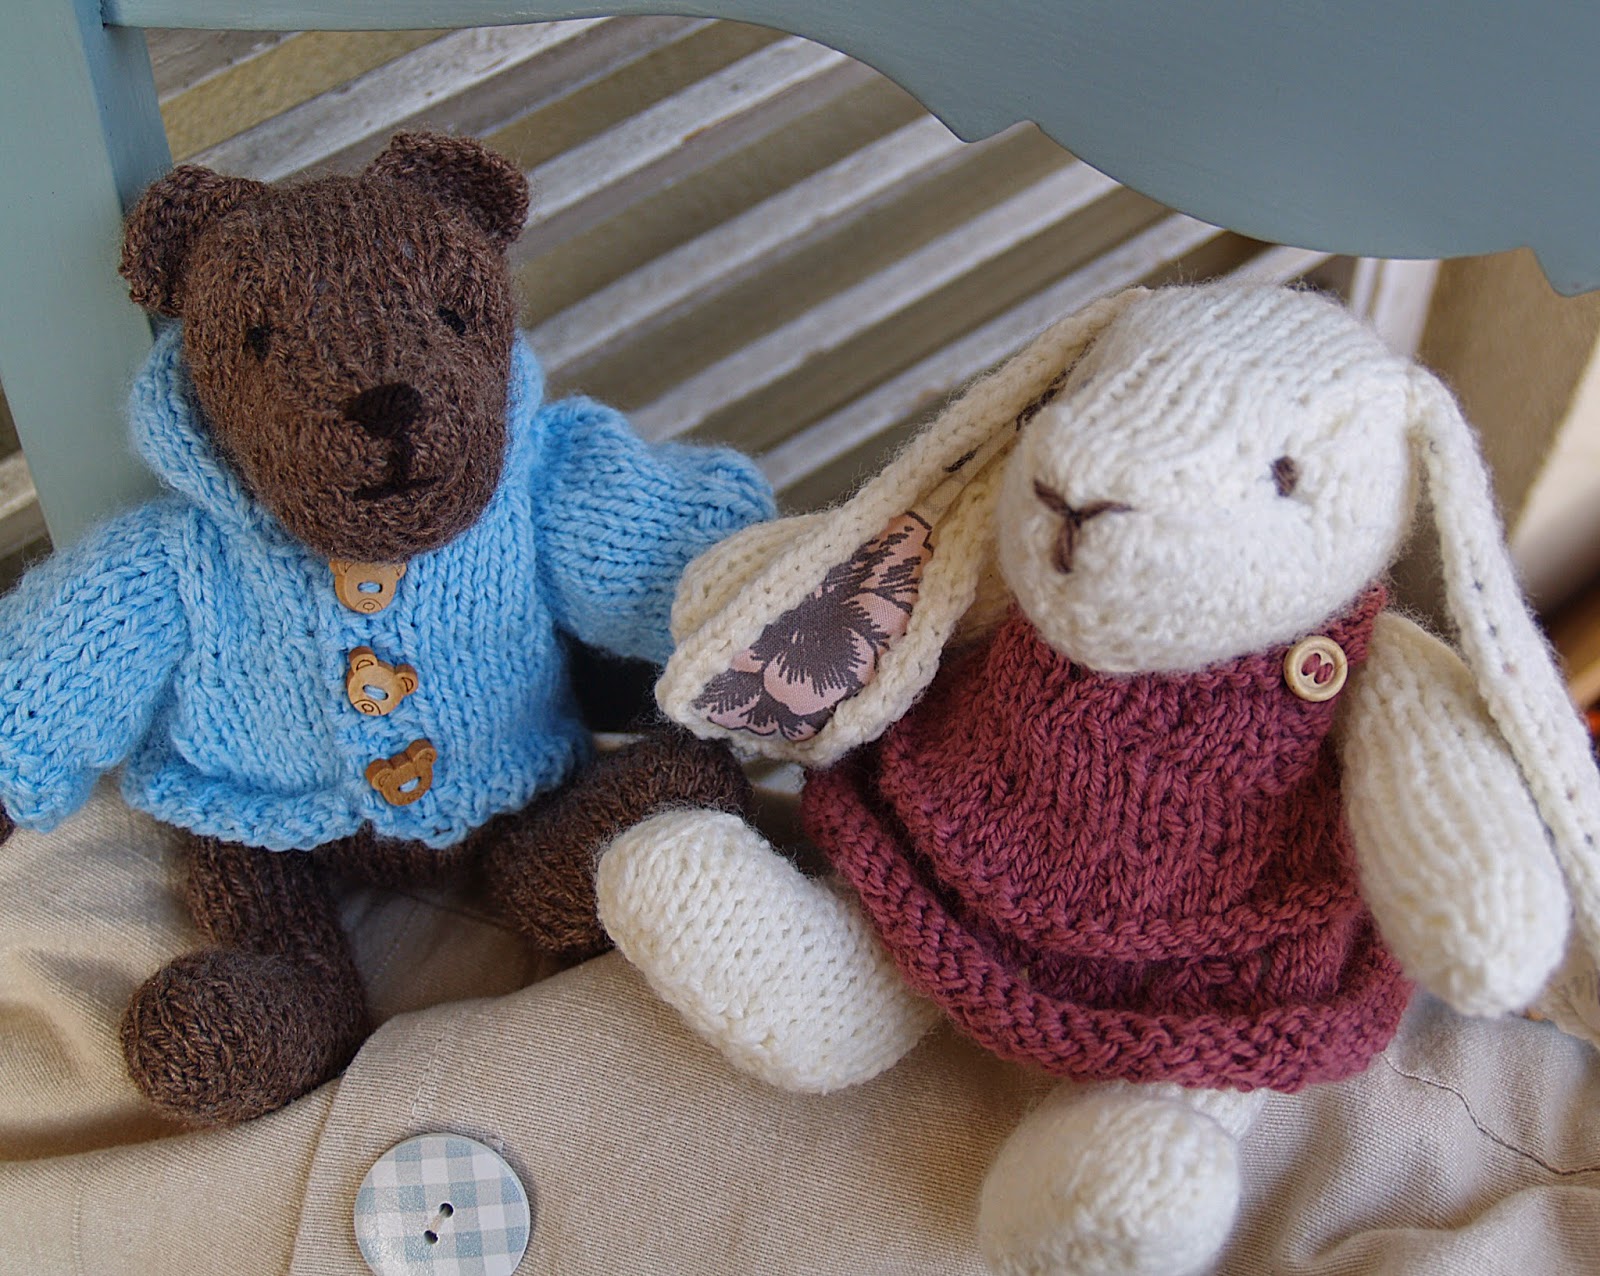


They're also a great example of how our interpretations and executions of patterns can influence the final shape of our work, so I hope these two have at least a little bit of me in them too ;)
The two bigger changes I chose to introduce is using the stockinette stitch for bunny ears and then finishing them off with a flowery fabric. I think it really gave them a nice touch. To do that all you need to do is use the woolen ears as a pattern to cut out the fabric and just sew it by hand with white or beige thread.
I also decided that both my toys will be able to move their arms and legs. In order to do that, I attached transparent buttons to the top or the arms and legs (in the middle of the area you'd normally attach to the body) and pushed them through a hole between two stitches. You'd be surprised how flexible these are and that you can easily do that with a button of 1 cm diameter without leaving any trace. To make sure that the arms stay together, I used the same yarn to attach the first button, pulled it again through one of the button holes and through the part of the body between the two arms. Then I continued by attaching the second button and the second arm and finally pushing the second button through the stitch so that both remain hidden in the body. Finally, I did the same with the legs. This technique not only allows you to attach the body parts, but you can also decide on how close they'd stay to each other by pulling the yarn that joins the two body parts, the same way you'd normally do it with the eyes.
Sunday, 15 March 2015
Amigurumi scaling tricks

Wanna create an animal family and need to mark the difference between adults and babies?
The same pattern can be used for a variety of sizes if you apply a few simple tricks.
Rule number one
The magic number
You most likely already noticed that a
great majority of patterns starts with a chain of six.
It's not a coincidence. Six is a very
comfortable number for both cones (6,9,12,15...) and spheres
(6,12,18,24...) and it's easily multiplied (increase) or divided
(decrease) by 2.
So if your pattern starts with a sphere
or cone, all you need to do is start with a lower number or keep
increasing the number of loops to the desirable size.
Rule number two
The maths
You can easily notice that the pattern
for cones follows this basic rule: 1 – 1,5 – 2 – 2,5 which in
terms of crotchet could be presented as: x*sc,
x*(1sc-1ds),x*(2sc-1ds),x*(3sc-1ds),(...); where x is the initial
number of loops in your chain, sc a single crotchet and ds is
double-stich (increase). Note that the number of single crotchets
increases by one in each following row.
For spheres the pattern changes
slightly, it goes 1-2-3-4, which
is:x*sc,x*ds,x*(1sc-1ds),x*(2sc-1ds),(...); with x being the initial
number of loops and the same increase of 1sc in the following rows.
The same rule applies to decrease (dc),
however this time we'll be going backwards, i.e. cones (…)
x*(3sc-1dc),x*(2sc-1dc),x*(1sc-1dc),x*dc and spheres (…)
x*(2sc-1dc),x*(1sc-1dc),x*dc
Rule number three
When it's not about ds or dc anymore
The number of repetitions for each raw
should also change, especially in the parts when you need to repeat
the row more than twice. Your choice of the number of repetitions may
depend on the final effect you want to achieve, but as a rule of a
thumb, I suggest you multiply the number of rows by 1,5, rather than
2. It should keep the proportions quite right.
Rule number four
Not everything needs to change
You will soon notice that not all the
parts of your final work need to be bigger than in the original
pattern. Sometimes keeping one element the same size works perfectly
with both well. For example, I chose to keep the original size of
eyes, ears and wings for my two owls.
Rule number five
You can always go back and repeat
When changing the original patterns,
it's good to take notes of the changes you introduced. This way you
can always go back and correct your work and repeat the patterns for
elements that come double (ears) or more (legs).
Find here the original patterns for
Friday, 13 March 2015
DIY leftovers LOVE frames
shells, buttons, fake flowers,
scrapbooking paper … anything you can find in a crafter's
drawer can be easily turned into a fun decoration for an empty wall

What do I need?
4 picture frames
4 sheets of two-sided scrapbook paper
4 mini wooden pegs
drawing pins
hemp cord
glue gun or silicon
fake flowers, buttons, shells, coins or
any other small objects you might want to use for your project
What do I do?
First, wrap the frames in scrapbook
paper using drawing pins to fix it at the back. This way you spread
it like canvas and you can make adjustments or even recycle the
materials in the future. I chose to use both sides of the paper,
making two checked and two heart-print frames.
Then, use each frame to place the
buttons, shells etc. in the forms of letters L O V E.
Take your time to experiment with sizes
and colours before you glue your 'leftovers' to the paper with
silicon or hot glue. It's a good idea to attach hemp cord to top
corners of the frame before you glue your letters, this way you won't
damage them when pressing in the drawing pins.
Once your four pictures are ready, hang
them using wooden pegs on a spread hemp cord. Enjoy!

Subscribe to:
Comments (Atom)